When users go through several proxies before reaching out your web server, the IP field in IIS may show only a proxy IP address instead of the actual client IP address. In this post, we will see how to find the actual client IP address in this scenario.
Long story short, you can use X-Forwarded-For request header to find the IP address of the client who sent requests. This field is not logged in IIS by default. Therefore, you need to configure custom logging in your web server.
Configure IIS to log actual client IP address
The way custom logging (also called advanced logging or enhanced logging) is configured is different based on IIS version. See the corresponding instructions below.
Looking for a list of IIS versions? Check this post out.
Which directory the custom logs are stored in?
In IIS 7/7.5/8: %SystemDrive%\inetpub\logs\AdvancedLogs
In IIS 8.5+: %SystemDrive%\inetpub\logs\LogFiles
Add X-Forwarded-For column in IIS 7/7.5/8
- Open IIS Manager
- On server, site or application level, double click “Advanced Logging“
- In the action pane on right side, click “Enable Advanced Logging“
- In the action pane, click “Edit Logging Fields“
- In the new window, click “Add Field“
- In “Add Logging Field” window, fill out the following fields
- Field ID: X-Forwarded-For, Source type: Response Header, Source name: X-Forwarded-For
- Click “OK“
- In the middle pane, select the default log definition “%COMPUTERNAME%-Server“. Click “Edit Log Definition“
- Click “Select Logging Fields”
- Select “X-Forwarded-For” from the list. Click “OK“
- Click “Apply” in the actions pane
Wait for a new log file to be created. Column changes will be effective when a new log file is created. You may need to generate some traffic to fill and close the current log file.
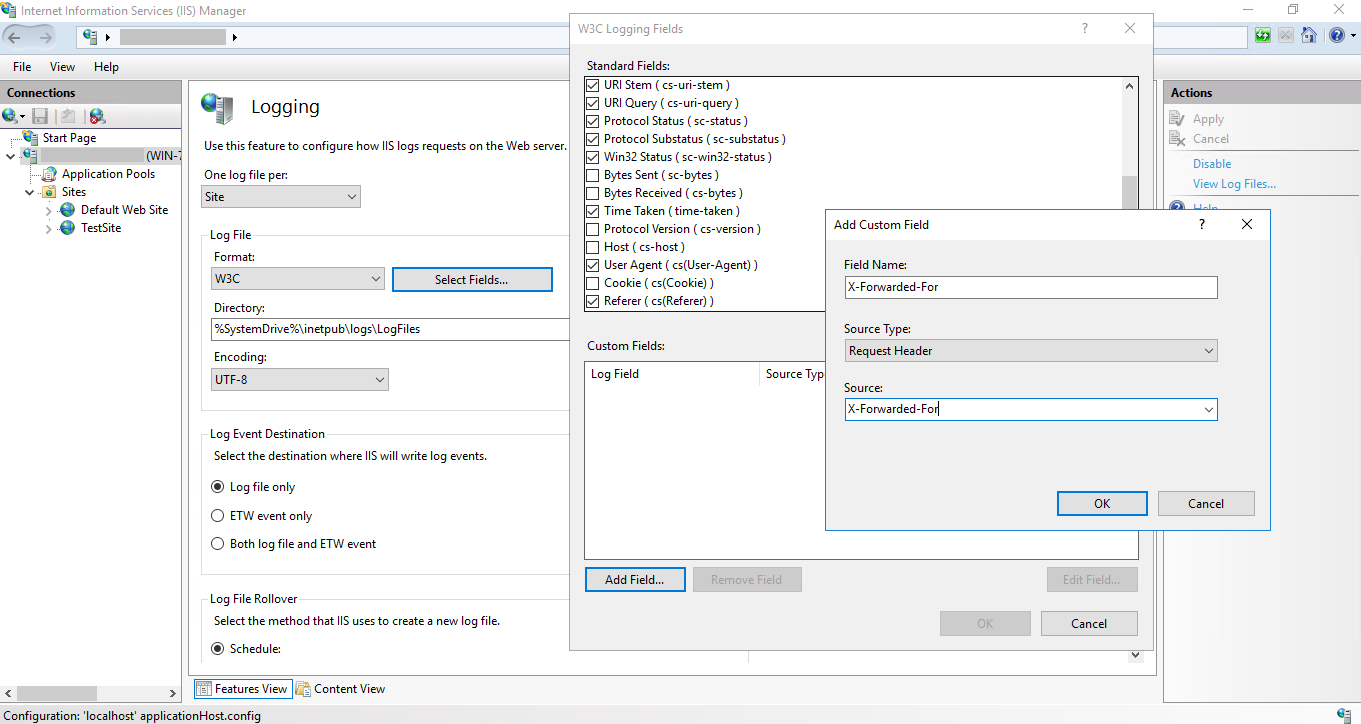
Add X-Forwarded-For column in IIS 8.5 and newer versions
Custom logging became a lot easier with the IIS 8.5. Follow the steps below to add X-Forwarded-For column into IIS logs.
- Open IIS Manager
- On server, site or application level, double click “Logging”
- Click “Select Fields“
- In “W3C Logging Fields” window, click “Add Field“
- In the “Add Custom Field” window, fill out the following fields
- Field Name: X-Forwarded-For, Source type: Request Header, Source: X-Forwarded-For
- Click “OK” in both open windows
- Click “Apply” in the actions pane
Wait for a new log file to be created. Column changes will be effective when a new log file is created.
Note 1: If you see a dash (“-“) in
X-Forwarded-Forcolumn of the log file, it means the client didn’t use any proxies. Therefore, the client IP must be in the “c-ip” column
Note 2: You may see multiple IP addresses in
X-Forwarded-For: client1, proxy1, proxy2, …X-Forwarded-Forcolumn of the log file, it means the client went through more than 1 proxy. Each proxy adds their own IP to the end of the value. The left-most IP address is the actual client IP address. Others belong to proxies the client go through.
PowerShell command to add X-Forwarded-For at server level:
Add-WebConfigurationProperty -pspath 'MACHINE/WEBROOT/APPHOST' -filter "system.applicationHost/sites/siteDefaults/logFile/customFields" -name "." -value @{logFieldName='X-Forwarded-For';sourceName='X-Forwarded-For';sourceType='RequestHeader'}Replace c-ip with client IP address
Instead of adding a new header (X-Forwarded-For), you may want to replace existing c-ip column with the actual client IP. This was easier before IIS 10. There was an ARR module for IIS 7/7.5/8 (reference) and Advanced Logging for IIS 8.5 (reference).
In IIS 10, it looks like the only option is that writing a custom ISAPI filter that will monitor the incoming requests and place actual IP into c-ip. There is currently no official module for this purpose but there might be third-party modules.
ARR Helper
If you implemented client IP address by using ARR Helper in IIS 7 and wondering how to do the same in IIS 10, follow the steps below.
Instead of using arr_helper_x64.msi, use requestrouterhelper_x64.msi in IIS 10 machine:
- Install ARR 3.0 to a server. It doesn’t have to be one of the IIS server you actually use. We need to ARR 3.0 installation just to get requestrouterhelper_x64.msi from its folder
- Go to installation directory (%ProgramFiles%\IIS\Application Request Routing). Copy requestrouterhelper_x64.msi to your IIS server
- Open a Command Prompt and go to that folder. Run “install requestrouterhelper_x64.msi”
X-Forwarded-For with CMD and PowerShell
In order to create x-forwarded-for custom log field (or any other custom log field), use the following command in Command Prompt:
C:\Windows\System32\inetsrv>appcmd.exe set config -section:system.applicationHost/sites /+siteDefaults.logFile.customFields.[logFieldName='x-forwarded-for',sourceName='x-forwarded-for',sourceType='RequestHeader'] /commit:apphostThe following PowerShell command does the same job:
Add-WebConfigurationProperty -pspath 'MACHINE/WEBROOT/APPHOST' -filter "system.applicationHost/sites/siteDefaults/logFile/customFields" -name "." -value @{logFieldName='x-forwarded-for';sourceName='x-forwarded-for';sourceType='RequestHeader'}
Great Info bro